Blockchain Network Simulation
The simulation is divided into 3 parts:
- P2P Network Simulation
- Use Mininet to build networks with different topologies (such as star, ring, tree, and mesh), and limit the bandwidth of different links.
- Each node can generate certain types of data, communicate with other nodes, and build a local database that records the addresses of different nodes and the data types of each node.
- Transmit data (of different sizes and in varying quantities) between different nodes.
- Blockchain Simulation
- Implement a simulation of the blockchain network.
- Simulate transactions (blocks) of the P2P network and the propagation logic.
- Implement the PoW algorithm to simulate mining.
- Limit link bandwidth and test the network latency and forking conditions under different block sizes and block generation intervals.
- Use the PBFT protocol for consensus.
- Attack Simulation
- Conduct experiments on the basis of the simulated Bitcoin network.
- Run simulation experiments and record the probability of a successful attack (being able to produce a longer chain that invalidates certain existing blocks) under different hashing power levels.
- BGP hijacking and Eclipse attacks.
The project repository is located at https://github.com/131250106/bitcoin
System Design
System Architecture
The system architecture diagram of this project is shown in the figure below:
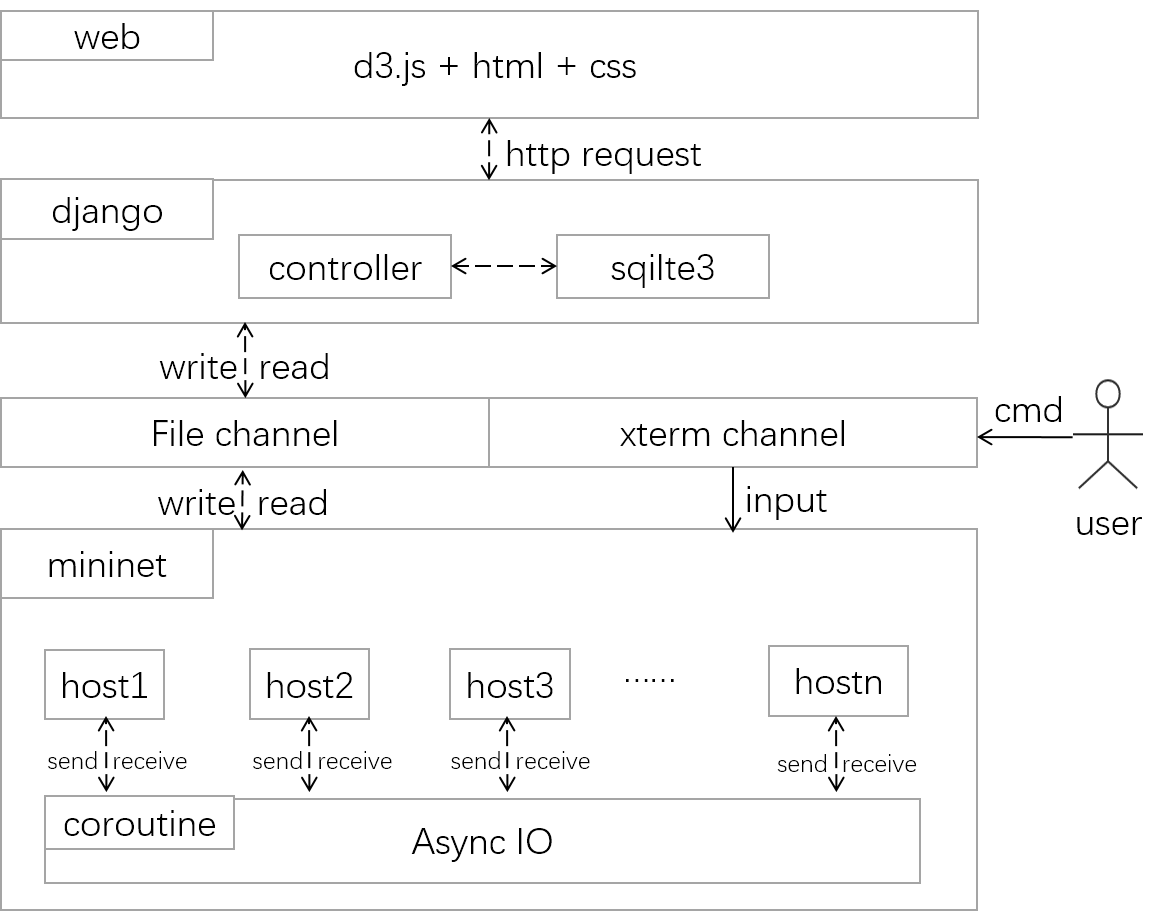
This project is mainly divided into 5 layers, described in detail below.
Mininet Layer
Mininet, as a lightweight software-defined networking research and testing platform, has the following main features:
- Supports Openflow, OpenvSwitch, and other software-defined networking components.
- Facilitates collaborative development among multiple developers.
- Supports system-level replay testing, complex topologies, and custom topologies.
- Provides a Python API.
- Good hardware portability (Linux compatible), making results more convincing.
- High scalability, supporting network structures with over 4096 hosts.
In this experiment, we use Mininet to build networks with different topologies, such as star, ring, tree, and mesh, and simulate various network conditions by limiting the bandwidth and delay of different links for experimentation.
The Mininet layer mainly provides virtualized IPs and ports, and creates host entities representing different nodes, laying the foundation for network communication at the Async IO layer.
Async IO Layer
Since P2P networks need to simulate distributed environments and various remote method calls, conventional single-threaded/single-process programming models struggle to meet the requirements of simulating distributed systems. Therefore, we introduced the Async IO asynchronous method library supported in Python 3.x. Its main features include:
- Asynchronous network operations
- Concurrency
- Coroutines
Some of the key keywords in Async IO that we primarily use are:
- event_loop (Event Loop): The program starts an infinite loop and registers certain functions onto the event loop. When an event occurs, the corresponding coroutine function is called.
- coroutine (Coroutine): A coroutine object refers to a function defined using the
asynckeyword. Calling it does not execute the function immediately but instead returns a coroutine object. The coroutine object needs to be registered with the event loop to be invoked by it. - task (Task): A coroutine object is essentially a function that can be suspended natively. A task is a further encapsulation of a coroutine, containing various states of the task.
- future: Represents the result of a task that will be executed or has not been executed. There is no fundamental difference between it and a task.
- async/await keywords: Keywords introduced in Python 3.5 for defining coroutines.
asyncdefines a coroutine, andawaitis used to suspend blocking asynchronous call interfaces.
During the specific experimentation process, based on the IPs and ports provided by Mininet, we simulate the individual network node hosts and use Async IO to encapsulate the underlying socket communication interfaces for data messaging and transmission, thereby building the most fundamental network architecture. On top of this, we also introduced a routing table and implemented a DHT (Distributed Hash Table) based on the Kademlia protocol.
Channel Layer
This layer primarily implements support for external IO input of specified commands to operate the network and execute corresponding functions, such as:
- Creating new nodes
- Deleting nodes
- Creating Transactions
- ......
Two main methods are provided for inputting commands:
- File command reading: Asynchronously monitors changes in the input command file and executes instructions written to the command file at any time.
- Xterm command reading: Executes operations by entering corresponding commands in the Xterm command window.
Django Layer
Django is an open-source web application framework written in Python. It primarily uses the Model-View-Controller (MVC) pattern, organizing code in a way that separates business logic, data, and interface presentation. It aggregates business logic into a single component, so that improving and customizing the interface and user interaction does not require rewriting the business logic. The main structure is as follows:
- Model: Defines database-related content, generally located in the
models.pyfile. - View: Defines static web file-related content, including front-end content such as HTML, CSS, and JavaScript.
- Controller: Defines the primary code related to business logic.
This experiment uses the Django framework to parse requests sent from the front-end pages, calls asynchronous commands through methods in the corresponding controllers to operate the P2P network, and simultaneously saves information such as the blockchain, current Transactions, and current node addresses in local SQLite to achieve persistent storage.
Web Layer
This layer primarily implements visualization and page interaction functions. By introducing the D3.js visualization framework, it visually displays the current network topology. Additionally, jQuery is introduced to encapsulate the request addresses sent to the backend. Ultimately, a front-end page with functions such as displaying blockchain information, transaction information, and dynamically adding and removing nodes is implemented, providing a user-friendly blockchain system simulation interface.
The final page display effect is shown in the figure below:
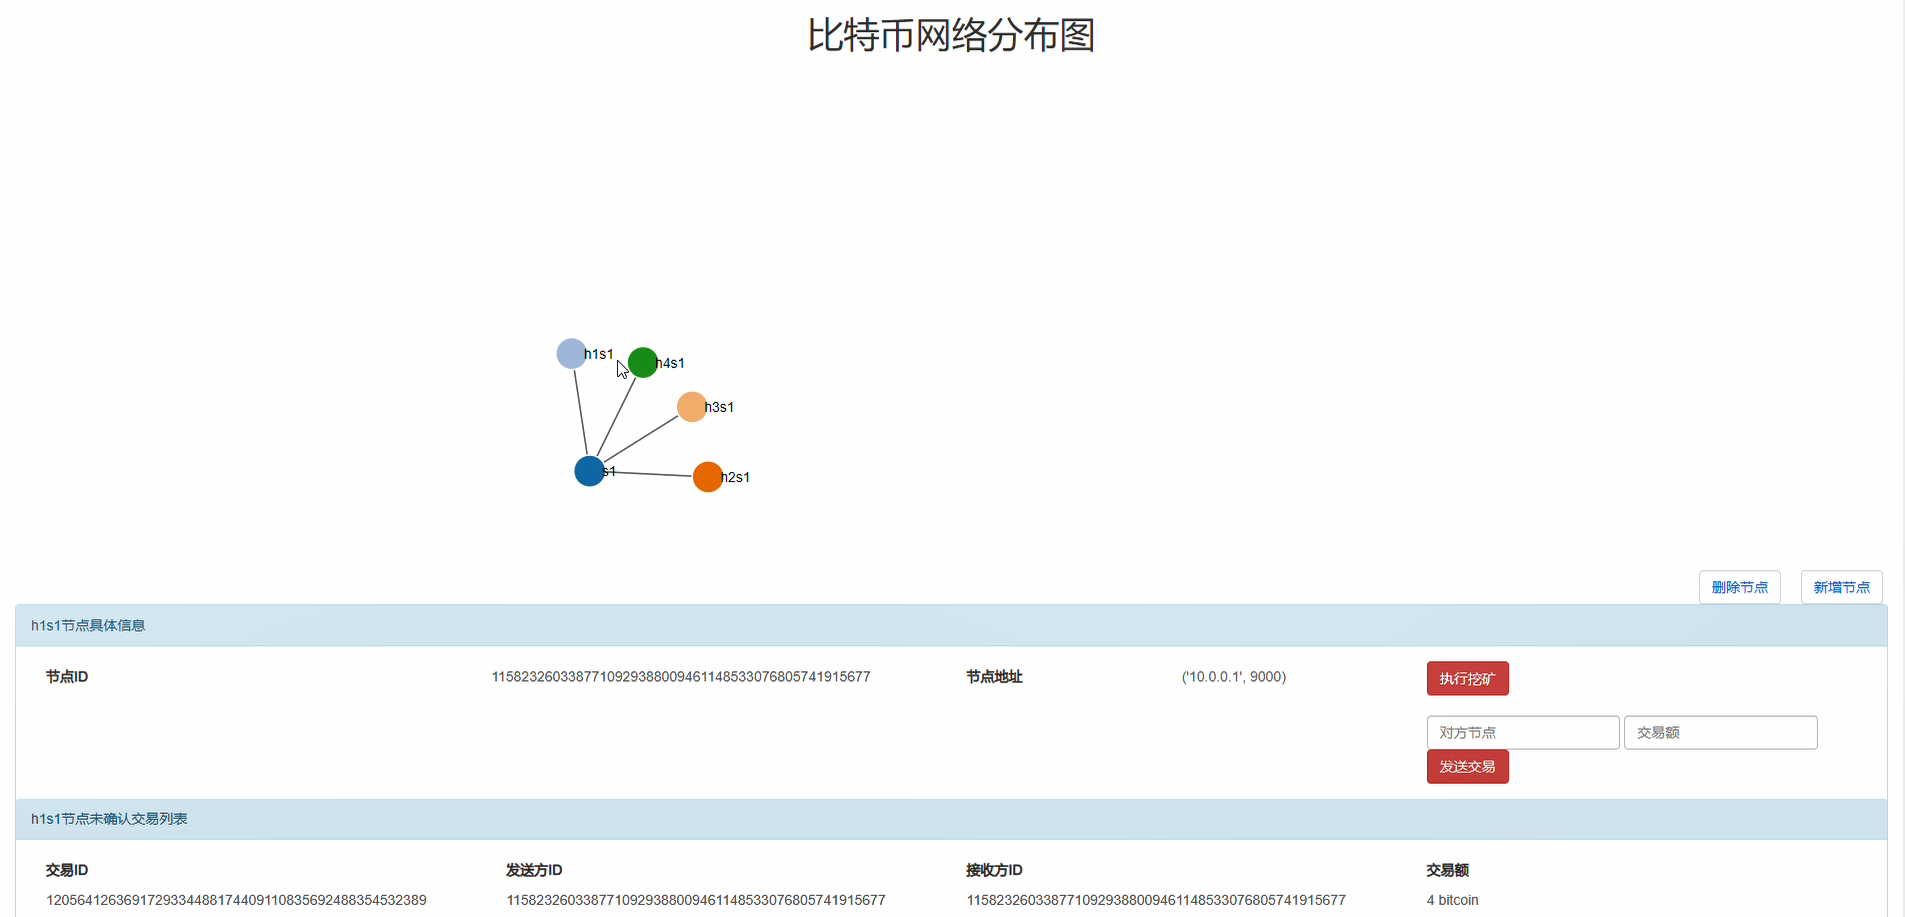
Detailed introduction will be provided in the Demonstration section.
System Module Design
The system module diagram of this project is shown in the figure below:
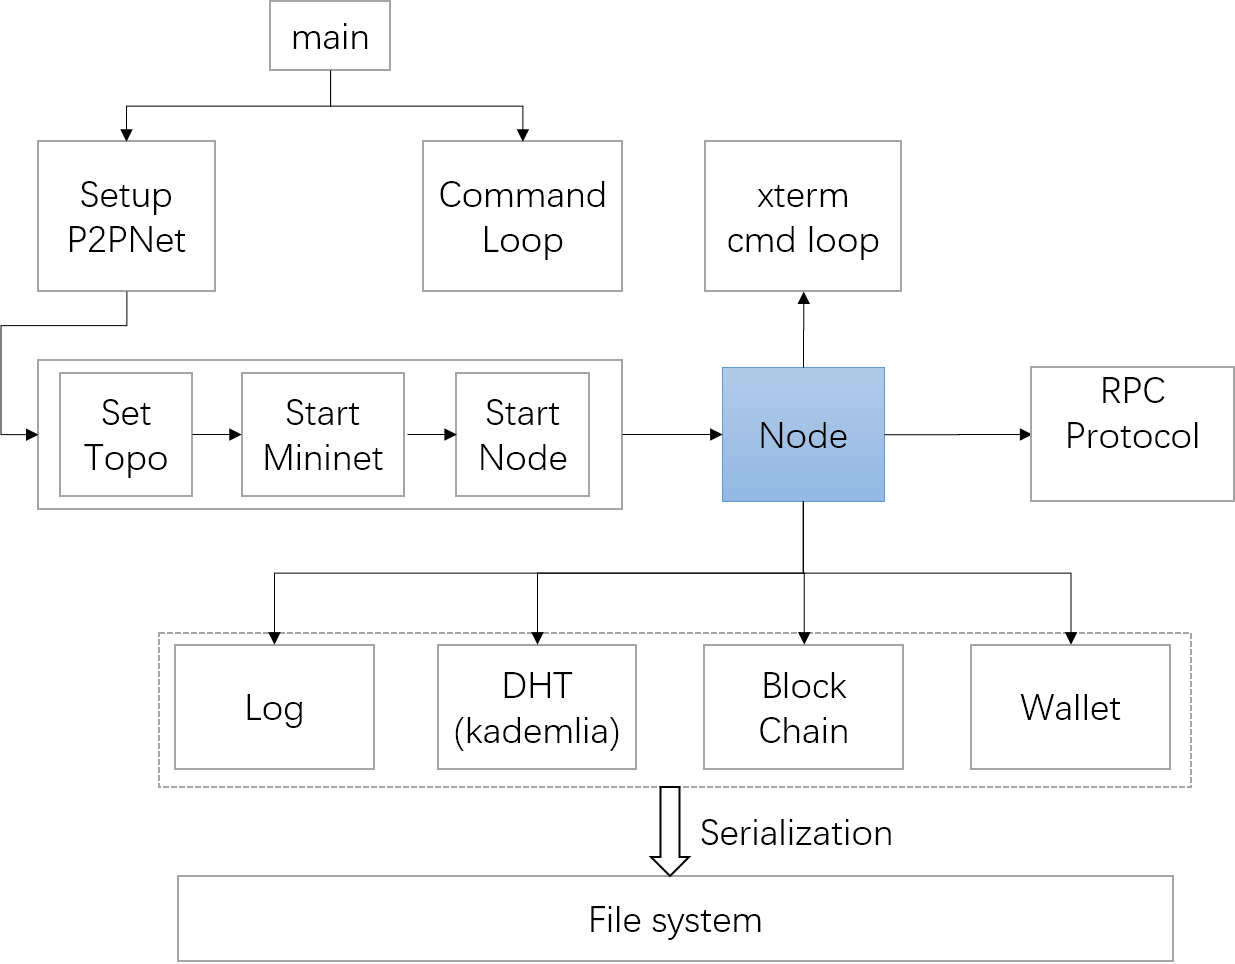
This system is built around the Node module as the core to construct the blockchain simulation system. Its main functions include:
- Starting networks with different topologies, such as star, ring, tree, and mesh.
- Controlling the system to perform certain operations through commands.
- Using asynchronous messaging and remote method calls to implement communication between nodes.
- Logging, DHT, implementing a simplified blockchain and wallet.
- Serialization of relevant data.
Detailed descriptions of each module are provided below:
System Startup Module
This project starts from the main function entry point and sequentially executes operations such as network topology generation, starting the Mininet network, and registering Node nodes to ensure that all nodes can communicate normally in the network. At the same time, a loop monitoring command-line input is started to accept command-line inputs and execute corresponding instructions.
Node Module
The Node module is the core module of this system. Its main functions include:
- Generating node IDs, routing tables, local IPs, local blockchains, and other initialized data structures.
- Providing asynchronous methods such as ping, updating the routing table, downloading neighbors' blockchains, and mining.
- Saving logs, and serializing the blockchain and wallet.
- Handling messages such as broadcasts, requests, and replies.
- Listening to file command-line inputs and Xterm command-line inputs.
RPC Module
The RPC module is a simple protocol encapsulated based on Async IO asynchronous methods. It supports the following functions:
-
Sending messages, divided into 3 categories:
- Sending requests
- Sending replies
- Sending broadcasts
-
Processing messages, divided into 4 categories:
- Processing broadcast messages
- Processing regular requests
- Processing reply messages
- Processing timeout messages
Node Sub-modules
This includes important modules called within the Node, briefly introduced as follows:
- Logging module: Responsible for saving runtime operation logs and serializing important information to the file system.
- DHT module: Implements a distributed hash table based on the Kademlia protocol.
- Blockchain module: Basically implements methods such as generating blocks, proof verification, and PoW (Proof of Work).
- Wallet module: Used to calculate the remaining balance of the current node.
Genesis Node Startup Flow
The genesis node startup flow diagram of this project is shown in the figure below:
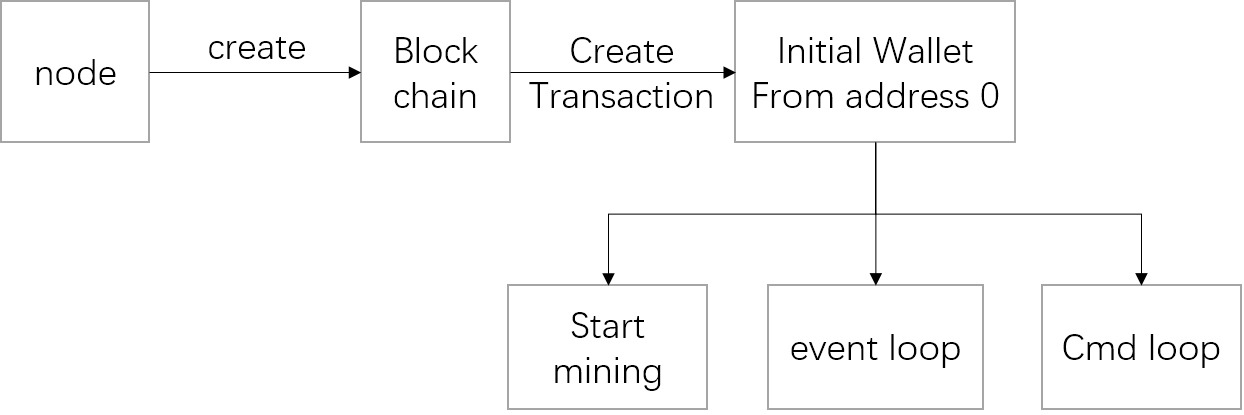
The process is as follows:
- When a node starts up and joins the network, it pings the predefined nodes and finds that its routing table is empty.
- The node creates a new blockchain and a new empty wallet.
- The node creates a new transaction, obtaining a certain amount of Bitcoin from a special node with address 0.
- The node starts mining and packages the transaction into the genesis block.
- The genesis node startup is complete, and it begins listening for various messages and sending corresponding messages based on command inputs.
Other Nodes Startup Sequence
The sequence diagram for other nodes in this project is shown in the figure below:
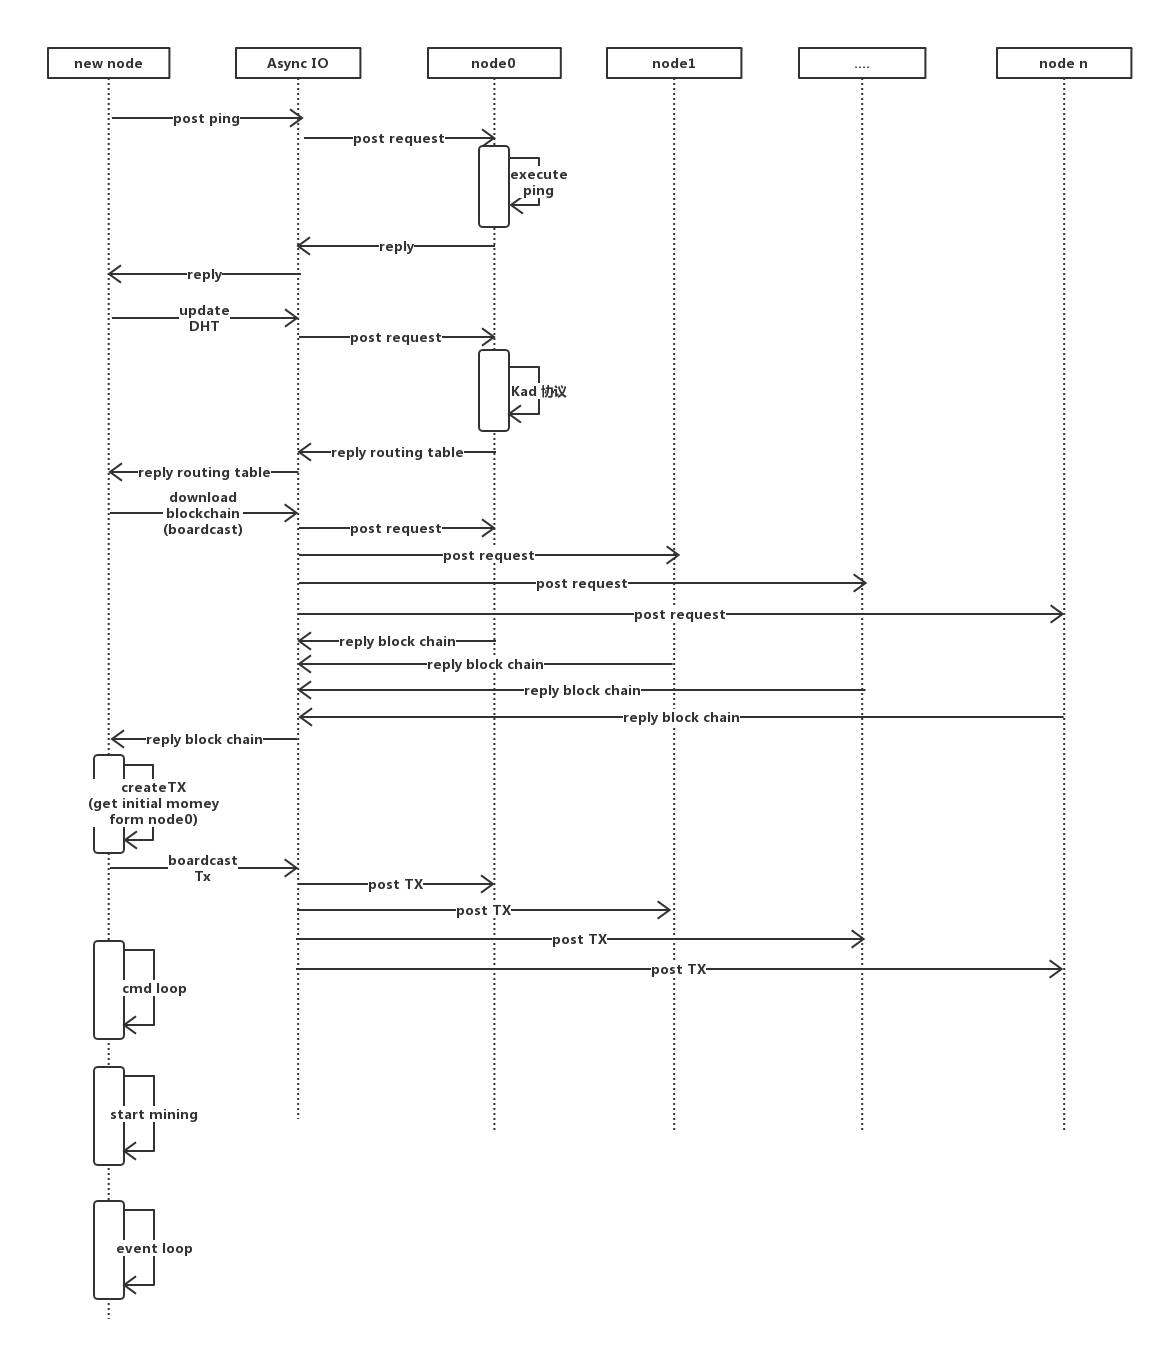
The operations performed when other nodes start up are as follows:
- Send a ping request to the initial node and receive a corresponding reply.
- Send a request to update the DHT and receive routing table information.
- Send a pull blockchain message to neighbor nodes, compare the lengths of received blockchains, keep the longest chain, and serialize it locally.
- Upon receiving a corresponding command, create a new transaction after verification and broadcast the transaction to neighbor nodes.
- Start the command monitoring loop.
- Open a new thread to execute the mining logic.
- Start the event monitoring and response operations.
Core Algorithm Design and Implementation
PoW Consensus Algorithm Design and Implementation
This experiment provides a simplified simulation of the PoW consensus algorithm. The main flow is as follows:
- After all nodes have started, open a new thread to execute the mining logic.
- Once a node mines a block, pull TXs from the transaction pool, verify them, and place them into the new block.
- After the node broadcasts the new block, it continues mining the next block.
- Once a node receives a new block, it immediately sends a semaphore to stop the current mining behavior.
- Verify the received new block.
- 5.1 If the verification passes, add the new block to its own chain.
- 5.2 If the verification fails:
- 5.2.1 Pull the blockchain from all neighbor nodes in its routing table.
- 5.2.2 Compare with its own blockchain one by one.
- 5.2.2.1 If the other blockchain is longer, overwrite its own chain with that blockchain.
- 5.2.2.2 If the other blockchain is the same length, find the fork branch point and perform a fork operation.
- Continue mining the next block.
The PoW consensus algorithm performs a certain amount of computation and consumes a certain amount of time to calculate an appropriate proof-of-work value that can be quickly verified by all nodes. This prevents data resource abuse in the blockchain system caused by hashing power attacks and ensures the fairness and security of transactions on the blockchain.
PoW Algorithm Implementation Verification — Simulating Double-Spending:
To verify the effectiveness of the PoW algorithm, we designed corresponding scenarios to simulate whether the algorithm functions correctly.
We randomly selected a certain node to send the same amount of money to two different nodes. Through experimental simulation, it was found that at the same moment, only one transaction would be confirmed, and the probability of double-spending is 0.
PS: The other transaction will eventually be confirmed by someone else or by the node itself when its wallet balance exceeds the transaction amount in the future, the money will be spent, and the wallet balance will decrease again.
PoS Consensus Algorithm Design and Implementation
PoS (Proof of Stake), intuitively, means that nodes with greater holdings have a higher probability of obtaining the right to record (forge the next block) and then receiving rewards. The specific simulation process is as follows:
- Each node randomly generates a value from [0, num] based on the number of Bitcoins in its current wallet (num), representing the size of its stake, and broadcasts it to all nodes.
- After all nodes have received stake broadcasts from other nodes, the right to record is granted to the node with the largest stake value.
- The node with the recording right verifies the transactions on that node, packages them into a block, calculates the hash, and then broadcasts the block.
- The remaining nodes receive the broadcast block, verify it, and add it to the end of the blockchain, completing the growth of the blockchain.
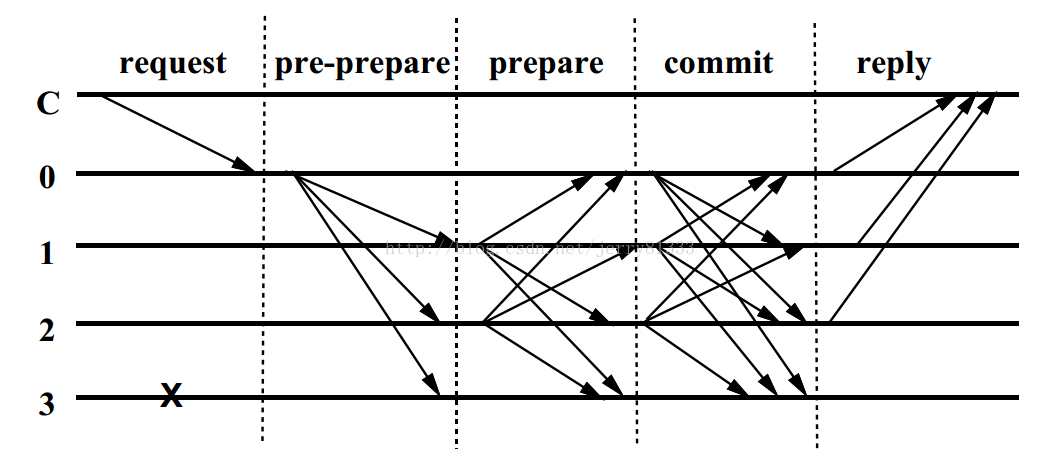
PBFT Consensus Algorithm Design and Implementation
- Initiating node i creates a block and calls node 1's
pre-prepare(self.id, block)method. - Node 1 sends a broadcast (excluding the initiating node i), calling the
preparemethod of other nodes. - Within the
preparemethod of all nodes, thepreparemethod of other nodes is broadcast-called, and the number of times it has been called is counted. If the result is greater than half of N, it broadcasts a call to thecommitmethod. - Within the
commitmethod, the number of times it has been called is counted. If it is greater than half of N, the block is recorded, and simultaneously thereplymethod of the transaction node is called. - Within the
replymethod of the transaction node, the count is tracked. If it is greater than half of N, the block is recorded, the wallet balance is deducted, and everyone's reset-count method is called.
Attack Simulation Experiments
Probability of Successful Attack Under Different Hashing Power Levels
To calculate the probability of a successful attack under different proportions of hashing power, we use a double-spending attack scenario for simulation. The flow is as follows:
- Once an attacking node mines a new block, in addition to pulling TXs from the transaction pool, it immediately creates a new TX, spending all of its own money and sending it to address -1 (simulating a cash withdrawal process), and creates two new blocks: block1 containing this TX and block2 without this TX.
- The attacking node sends block1 to normal nodes and block2 to itself (the attacking node).
- When a normal node receives the block, it validates the legality of block1, finds it valid, and confirms the TX. At this point, the withdrawal process is confirmed, and the attacker obtains the first cash.
- When the attacking node receives the block, it validates the legality of block2, finds it valid, and accepts the block.
- 4.1 If the attacking node mines a new block again, in addition to pulling TXs from the transaction pool, it immediately creates a new TX, spending all of its own money again and sending it to address -1 (simulating a cash withdrawal process), and repeats step 1.
- 4.1.1 The attacking node receives the block, validates it, finds no conflict, and adds it to the blockchain.
- 4.1.2 The normal node receives the block, validates it, finds a conflict, and pulls the blockchain from other nodes. If the chain is longer than its own, it overwrites its chain (ultimately, the previous withdrawal transaction is overwritten, and double-spending succeeds).
- 4.2 If the normal node mines a new block again, normal logic proceeds, and the blockchain operates normally.
- 4.1 If the attacking node mines a new block again, in addition to pulling TXs from the transaction pool, it immediately creates a new TX, spending all of its own money again and sending it to address -1 (simulating a cash withdrawal process), and repeats step 1.
- After a period of time, observe the total amount of all TXs from the attacking node to address -1, which represents the total withdrawal amount. If the amount is greater than the original Bitcoin holdings, the attack is considered successful.
- Record the probability of successful attacks under different hashing power levels.
Simulation Experiment Results:
| Attacker Hashing Power Ratio | 20% | 40% | 60% | 80% |
|---|---|---|---|---|
| Attack Success Probability | 2/38 | 7/48 | 9/35 | 22/65 |
Note: A/B — A represents the number of times the attacker cashed out, B represents the total number of mining rounds.
Forking Probability Under Different Bandwidths
By setting the bw (bandwidth) and delay of different links in Mininet, record the probability of blockchain forking.
| Bandwidth(MB)/Delay(ms) | 1000MB/0ms | 100MB/1ms | 10MB/0ms | 10MB/100ms | 10MB/1000ms | 1MB/1000ms |
|---|---|---|---|---|---|---|
| Forking Probability | 0/(20*5) | 0/(20*5) | 0/(20*5) | 0/(20*5) | 4/(20*5) | 12/(20*5) |
Note: A/(B*N) — A represents the number of forking occurrences, B represents the total number of mining rounds, N represents the number of nodes.
BGP Hijacking Attack Simulation
BGP Hijacking Attack
Based on relevant materials, the flow of the BGP hijacking attack we simulate is as follows:
- The attacker launches a BGP hijacking, splitting the network into two parts (previously the two networks were normally connected and mining) — a large network and a small network. Using Mininet, the delay between the two networks can be limited; setting the delay to infinity is considered as ping failure, meaning the two networks have been split.
- In the small network, the attacker issues a transaction to sell all of its cryptocurrency and exchanges it for fiat currency. The page displays this as the attacker generating a transaction, and the wallet balance being transferred to a special address (for example, "1").
- After the "full network confirmation" of the small network, a new block is generated, the transaction takes effect, the attacker receives the equivalent fiat currency, and the attacker node's wallet balance becomes 0.
- The attacker releases the BGP hijacking, and the large and small networks become interconnected. All transactions on the small network are negated by the large network (the large network's blockchain is longer than the small network's). The attacker's cryptocurrency is fully restored to the account, while the fiat currency obtained from the transaction remains in the attacker's hands, completing the profit. That is, the attacker node's blockchain is overwritten by the large network, and the wallet balance is restored to the state before the small network's blockchain forked.
Demonstration
Visualization Page Content Display
Network Structure
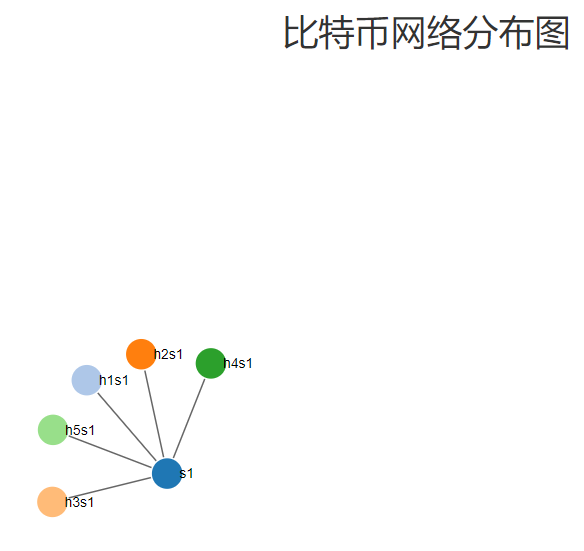
The network topologies that can be displayed include star, ring, tree, etc. The figure above shows a star topology with 5 nodes, where s1 is the switch.
Node Information

Mainly displays node ID, node address, and wallet balance information.
Transaction Information
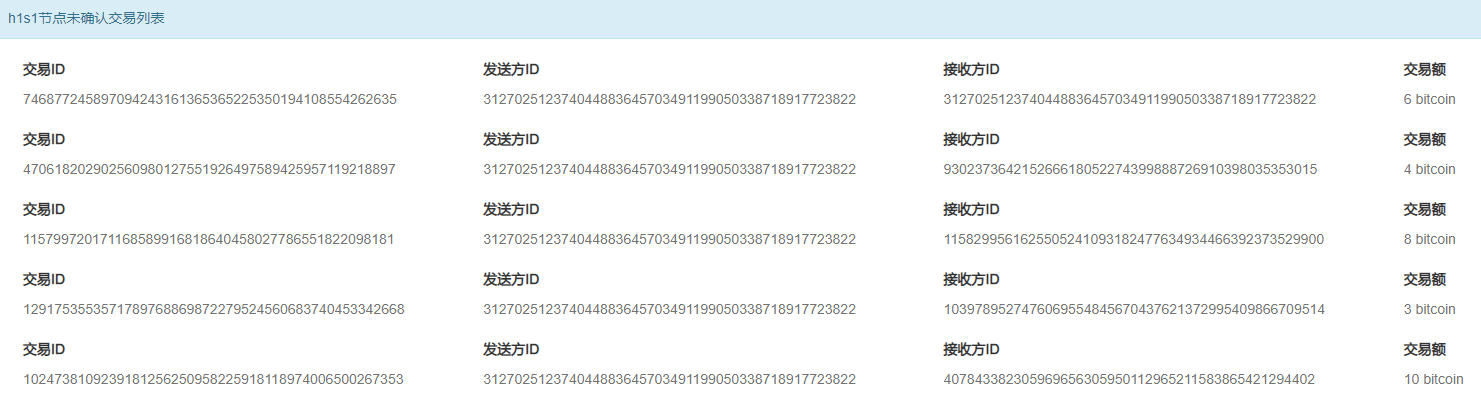
Mainly displays unconfirmed transaction information in the node.
Blockchain Information
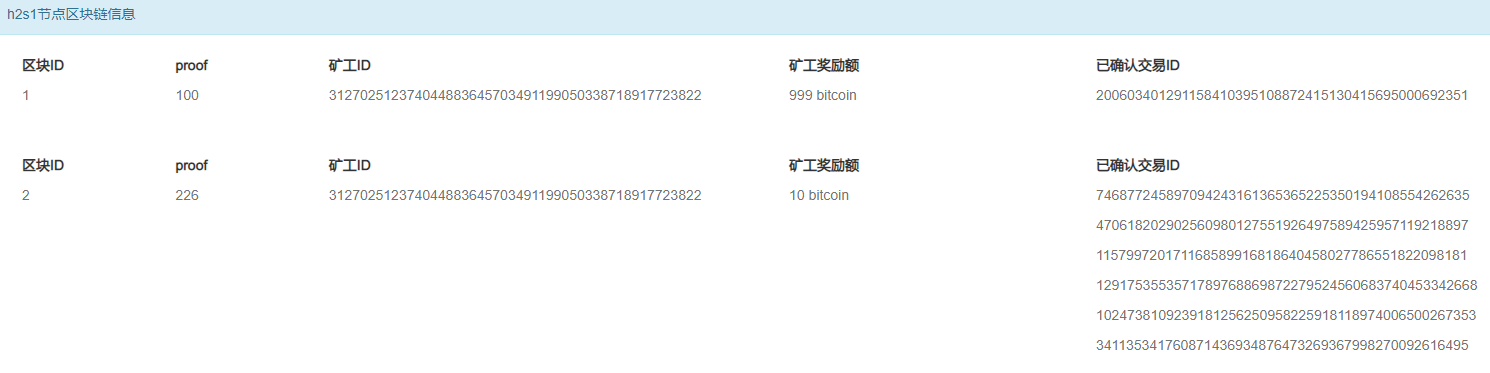
Mainly displays the blockchain information in the node.
Create Transaction Function Display

Mainly displays the function of creating a transaction by providing the IP address and Bitcoin amount.
BGP Attack Process Display
Network Structure
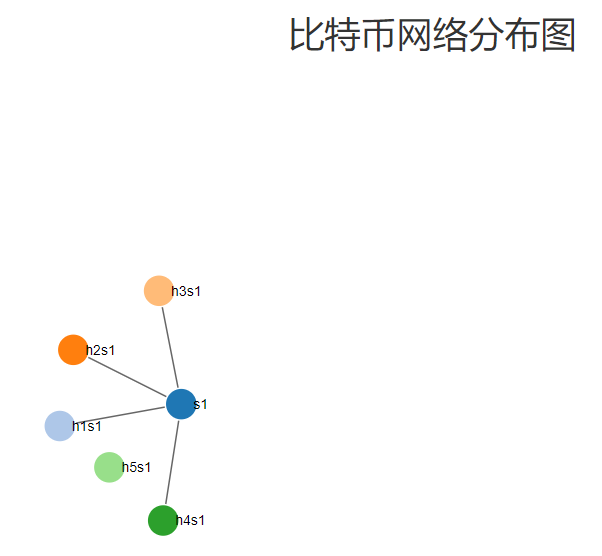
The figure above shows a star topology with 5 nodes, where s1 is the switch. h5s1 is the attacker node, and the remaining nodes are victim nodes.
Victim Node Information
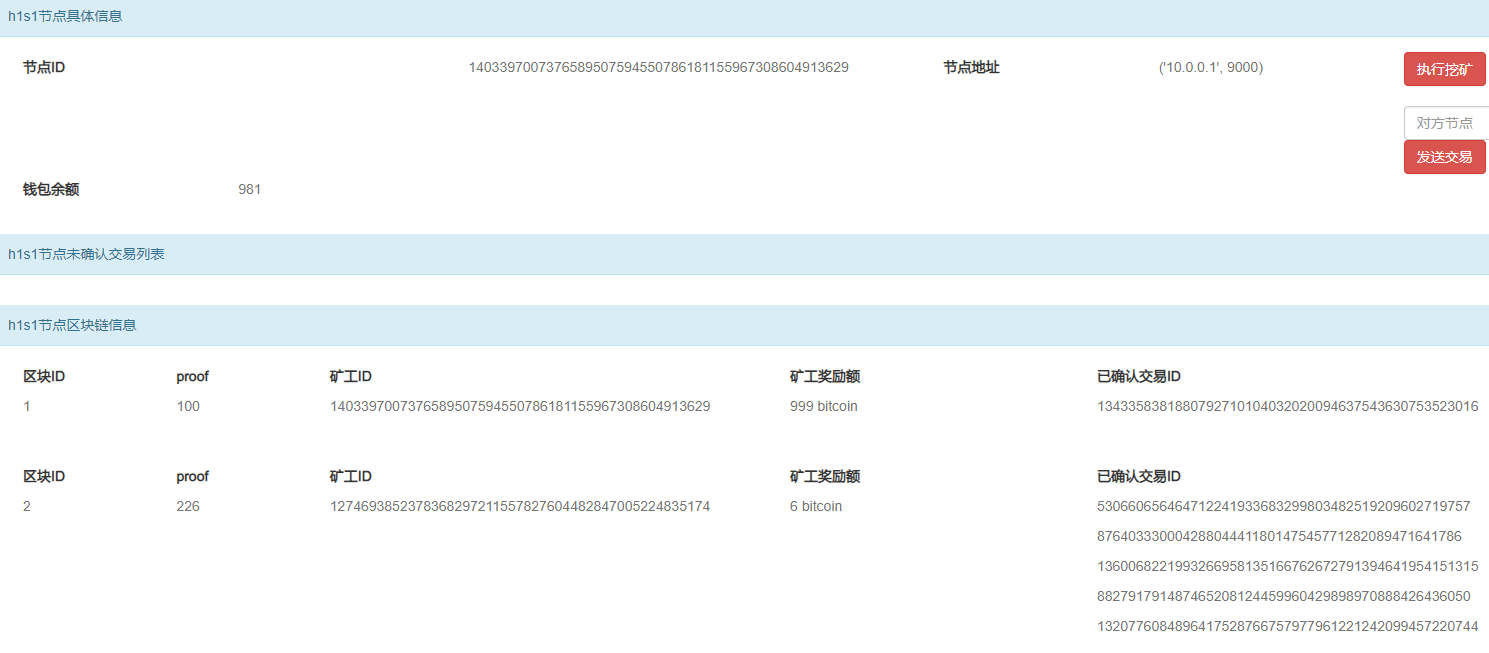
It can be seen that the victim node's blockchain length is 2.
Attacker Node Information
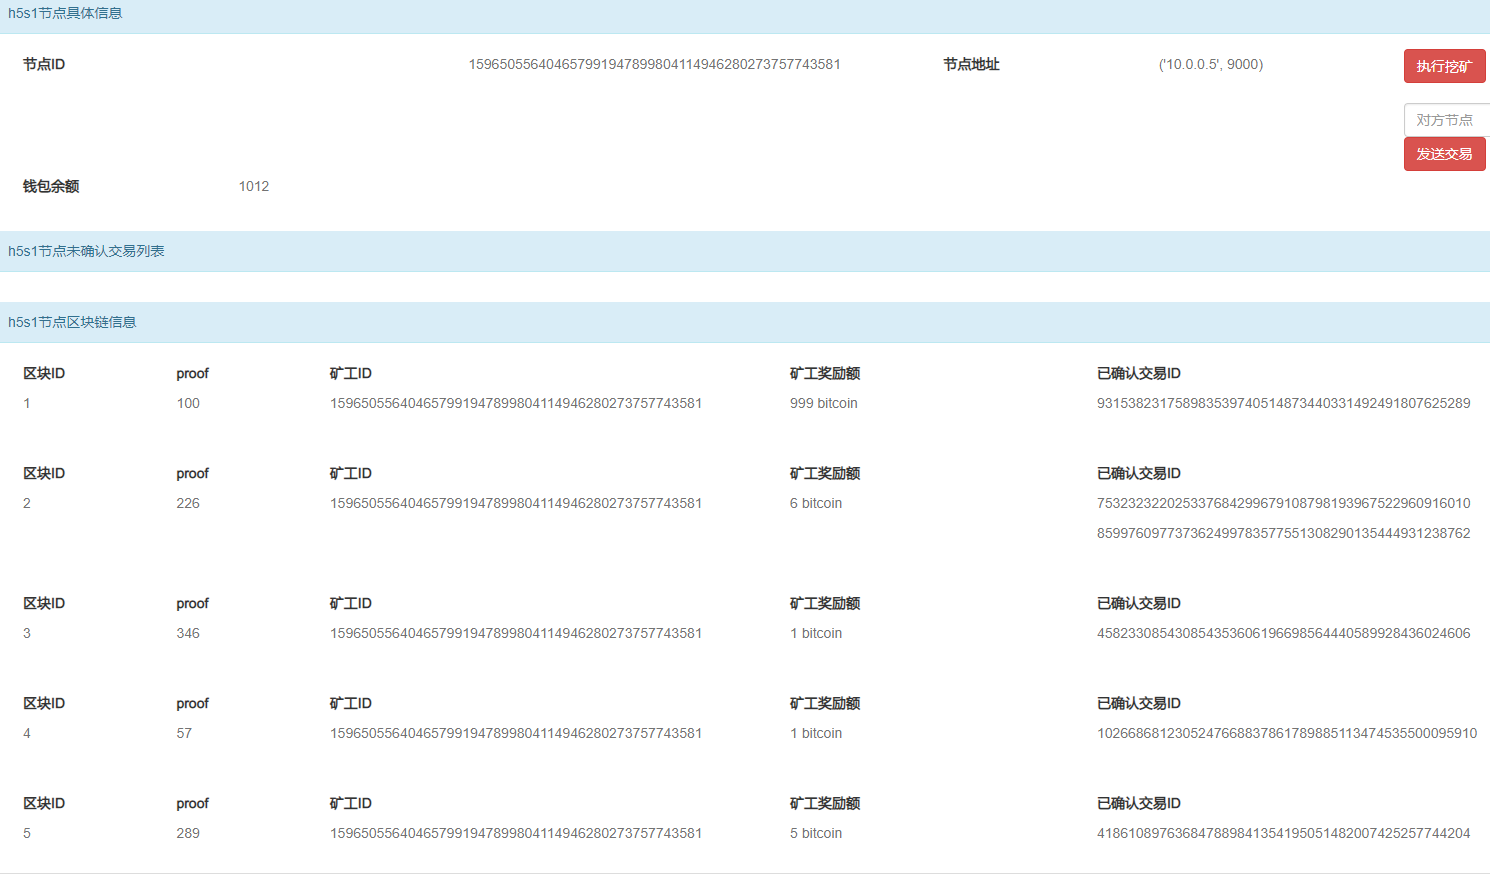
It can be seen that the attacker node's blockchain length is 5.
Network Structure After BGP Attack
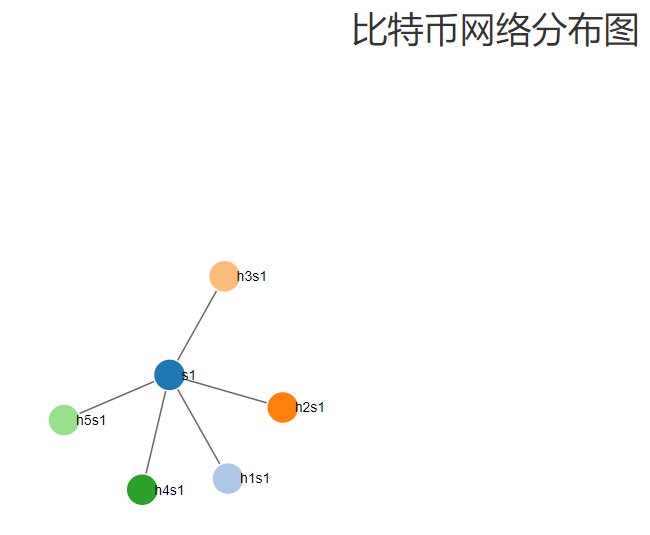
It can be seen that after the attacker releases the BGP hijacking, the two networks become interconnected.
Victim Node Information After BGP Attack
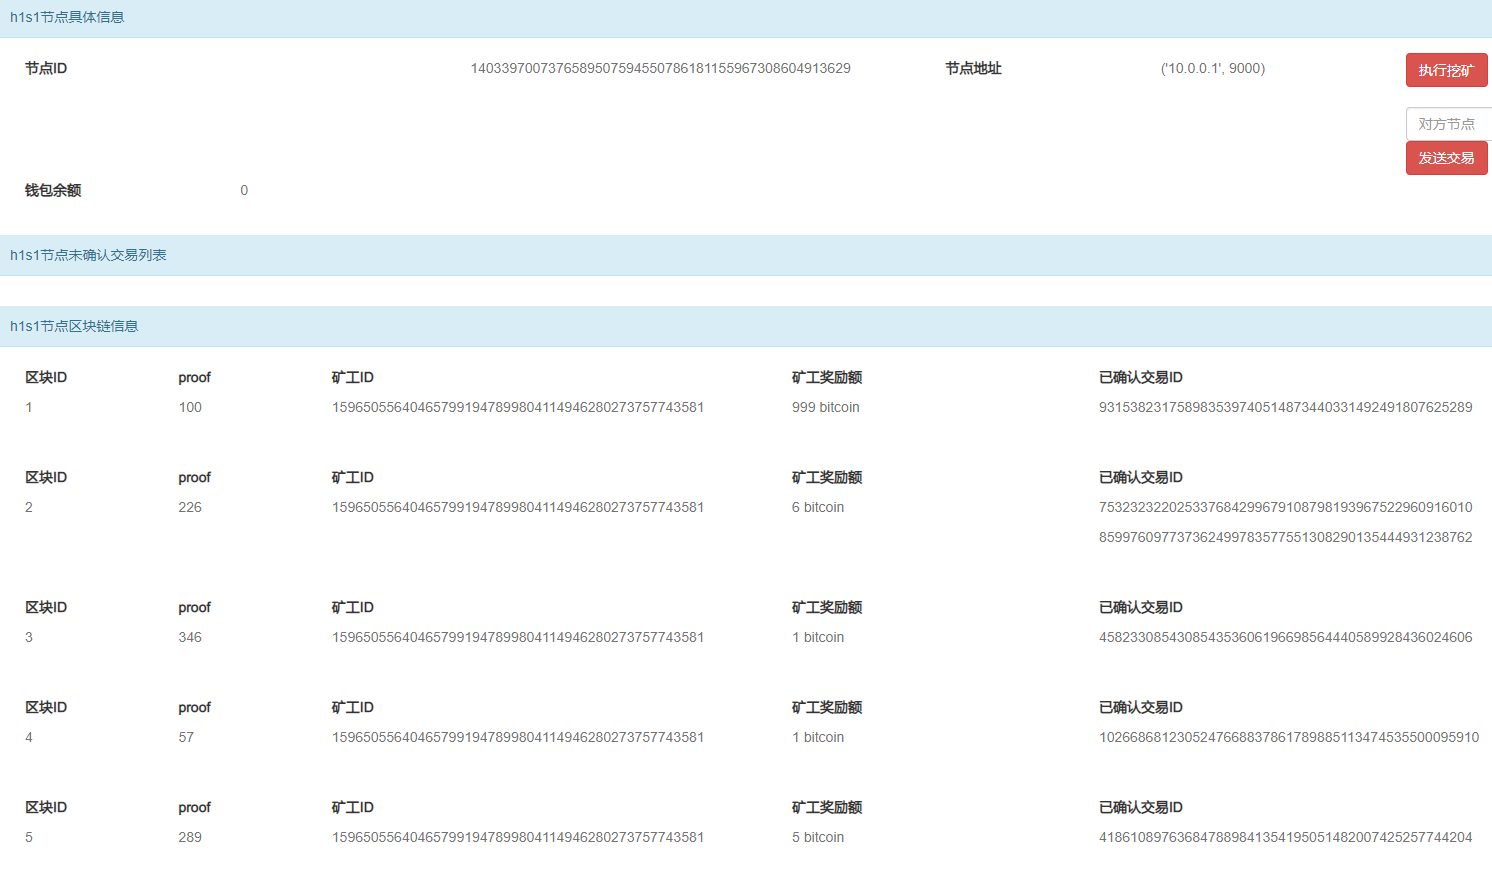
It can be seen that after the BGP hijacking, the victim node's blockchain has been overwritten by the attacker.